An effective testing strategy for Android (Part 1)

Photo by Florian Olivo on Unsplash

Some time ago, in the early days of Android development, the testing strategy was often the great forgotten in the projects for this platform.

I think there were a few fundamental reasons for this. For a start, we didn’t have clear design or architecture patterns to follow that facilitate the task of implementing testable code, this is code separated by responsibilities and isolated from implementation details and the Android Framework. Nowadays this is not so common but as we know we are all guilty at some point of our career as Android developer of placing all data, business and view logic in the same place, usually a big bloated Activity making the testing of this functionality pretty much impossible.

On the other hand, the Android SDK wasn’t facilitating this task as we didn’t have good testing framework and libraries, aside from basic JUnit tests and some automation features. It was difficult to set up and run, the primitive IDE didn’t help either (remember Eclipse?), documentation almost didn’t exist and Google itself didn’t provide proper guidelines and examples on this matter.

On top of that, maybe what I consider even the worst of the problems, we developers quite often didn’t consider a good testing strategy as a first class citizen but instead, more as overhead and an amount of work and time we couldn’t afford to spend (this still happen in some cases now days, but that is a different story for a different post).

Thankfully this now days has changed and most teams have in place some kind of testing approach. The Android framework has evolved a lot and it provides an extensive set of tools and a good framework for a different type of tests. The Android community has embraced several types of architecture and design patterns that facilitates the tests implementation for the different layers and components of the applications and we developers are more conscious about the critical role of a good test approach.

But despite all these improvements I believe that quite often we still struggle to implement an effective automated test strategy, able to guarantee as much as possible the correctness of all the different functionalities of our apps with a good return of investment from our time and effort.

What should I unit test and which is the scope of them? Do I need UI tests and how can I make them as fast and reliable as possible? What about integration tests, do I need them and what for? What about end to end tests or manual quality assurance? Should I favour any kind of tests over the others?

The purpose of this first article is to propose and describe an approach which I consider is an effective testing strategy that maximise the time and effort we spend providing the best return in terms of correctness, quality assurance and stability of our products. I will describe what I believe is the best way to distribute and use the different type of tests and tools we have in Android. In following posts I will be extending the information about different particular topics when they need a more in deep description and level of detail.

Why do I need a good testing strategy?

The main goals when we implement our test strategy are:

  • Allow the organic and sustainable growth of the code base maintaining the quality, robustness and stability.
  • Avoid slowing down and stalling of the development work.
  • Facilitate the ability to continuously improve, change and expand the functionalities of the product.

So we can’t deny the benefits of well rounded testing implementation, but to achieve this sweet spot we need to design carefully how are we going to invest our precious time. Tests implementation and running can be expensive and time consuming, and in many cases we might fall in the trap of creating test cases for the sake of tick the coverage boxes without getting any real value from them.

Requisites for a solid testing strategy

So what are the requirements to consider our approach effective and solid?

  • Priority to the important and critical parts of the code. The domain layer, classes and components that implements business logic, algorithms, etc. In here is where we need to put all our attention and efforts. This is the code that provides more value so it’s the code we need to protect the most with a good test safety net. Outside this area, we have mostly external services, database, network, infrastructure, etc.
  • Integrated in the development cycle. Test suites must be integrated in the workflow of the development team, they have to be part of the Continuous Integration flow and run every time we intend to merge new changes.
  • Reasonable development and maintenance cost with a good return of investment ratio. This means that our tests must provide high value and a good safety net but without penalising excessively the time and efforts to implement, run and maintain that make the task of implement this tests not worth it for the returned value.

In order to achieve this sweet spot of the highest value at lowest cost possible, we need to design carefully the test strategy: What type of test are the most adequate for this class, component or feature? Should I use Unit or Integration Test? Shall I follow strictly the usually recommended test pyramid?

We might think that a straightforward solution would be implement mostly UI tests using Espresso. At the end of the day we are a front end system and we are interested in testing that what the user see and the visual experience is correct and everything work as expected. If I can test that a whole user flow is working properly by emulating the same behaviour and checking the result, we can consider that the implementation is correct and defect free.

But UI tests are expensive to implement and slow to run. In some cases we need to set up complex application state that might include login, accessing remote and local data, maybe even access to device capabilities like camera, Bluetooth, etc. Or we have to go through a long user flow, and things get even worse when if the application has a considerable size and we have tons of screens and flow. If we need to run a whole tests suit of this type in a big application after every commit in the main branch, as we should, development cycles can get extremely long and cause a bottleneck in our Continuous Integration pipeline and in the general development flow.

In some projects things can get even worse when on top of the UI tests, and because we didn’t managed to create a good safety net and confidence in the quality achieved by our automated tests, we decide to also have in place and run a lot of manual tests. We end up with one of the common anti patterns in testing strategy, the testing cupcake, as described in this article by ThoughtWorks. On top of long UI automated test sessions we have to perform long cycles of manual tests.

To avoid these issues let’s take a look to a more heterogeneous approach that can help to keep test suites faster to run and less costly to maintain and develop while keeping a high level of confident in the correctness of the code.

The Strategy

The first requisite to be able to implement our strategy is that the application must be designed with an architecture that facilitate separation of concerns and modular design. Clean Architecture is a good example that is widely adopted in the Android community, but any other pattern would be perfectly valid. Apart from the obvious benefits of having in place a good architecture, like scalability, flexibility, adaptability, and so on, a well designed code base will make possible the testability of classes of modules with minimum friction and effort. A class that contains too many dependencies, with some of them belonging to the Android framework or other third party component will make the testing process really difficult if not impossible in many cases.

In order to guarantee the correctness of a feature as much as possible in the most effective and cost efficient way, we will be using a variety of type of test at a different levels of the code structure to maximise coverage. For this we are going to implement a combination of Unit, Integration, End to End, UI and Manual tests.

We need to prioritise automated over manual tests. Manual tests take long time to run, are prone to human error and more expensive in resources. We can launch the suite of automated tests for the whole project as many times as we want, but we can’t ask a human to test again and again the whole system every time we need it.

Having the majority of tests automated means we need to be able to run them as fast as possible. If we can guarantee and maximise the correctness validation of our application quick and automatically, this is going to allow us to develop, deploy and release much faster and frequently making our agile and train release process a well greased and efficient machine.

And this is what makes so important to choose a good combination of tests. If most of our tests are UI based end to end tests, running the whole test suite is going to be painfully slow and in many cases a flakey process. We need to provide the same level of confidence of correctness with faster and reliable combination of tests.

So to summarise all this, and because the reader quite probably will be familiar with the classic test pyramid defined by Mike Cohn, below we can see a variation of that as a graphical representation of all this strategy defined so far:

The proposed new test strategy pyramid

So now let’s take a look now at a high level the different type of tests that we need to implement and the purpose of each one. In the next blog posts we will dig into more detail about all of them, tools and libraries to use, examples and recommendations.

Unit Tests

These should be implemented in critical parts of the code base, usually domain classes containing business rules, algorithms, etc.

What is an Unit Test and how to approach the implementation and the different techniques will be the topic of the part II of this series of articles. The There is a lot of debate and different philosophies to approach unit tests implementation, but to summarise the key concepts, they must be focused in a single unit of behaviour, not necessarily a single class and we should try to use real dependencies as much as possible, trying to minimise the use of mocks and fakes to only when really necessary. Is also important that we test what this component does, but not how they do it.

Integration Tests

These are test where we are going to validate that different components of our system are working together correctly. For example we could be testing how a repository, an Interactor and a ViewModel are working together and if based on a data state in the repository the view model is receiving the expected data in the correct type and format after a request via the Interactor. These tests run in the JVM and not in a emulator or a real device, making them fast and reliable.

Once again here we can see how important is to implement a good architecture in our application, so we can define the different responsibilities and scope of the tests. Something to take into account here is that in some cases we will might be unit testing one class or component and also we will be testing how this component work together with other components to achieve certain task.

As we can see in the pyramid, is in these type of tests where we should spending much of our time because is where we are going to receive more value for this investment. These tests are fast to execute as they don’t depend on a mobile phone or emulator.

UI Tests

In here what we are going to test is that the screen is representing a state of the app correctly, with the right data, position of the component, user interactions, etc. These run in a real device or an emulator, which mean they are expensive and slow. If we are using the MVVM pattern, the way to go is just to define and set up states and the models with different data depending on the test scenario and validate the UI with the Espresso assertions. The key here is that we are just testing the UI in isolation of the rest of the application, this tests should be relatively fast to run. As we will see in next articles here the Android class FragmentScenario is our friend.

End to End Tests

These are the most expensive to implement and slow to run of all the tes types, for this reason we will be implementing as fewer as possible, prioritising those critical user flows and core functionalities of our app. These are blackbox tests so we are testing the scenarios in the same way a user would be using the application. This provides a strong assertion about the correctness of the features in our app as we are testing the whole implementation, and if we have staging or other kind of development environment we can actually be including the network requests and any other external process.

Manual Tests

Finally we have the tests performed by humans. If we have implemented a full suite of tests off all types described above, these should be the smaller section of all the process. In here the QA team (if we have one, if not the developers) should be just running some smoke tests and any edge cases that couldn’t be asserted with all the automated tests implemented so far. Basically we should avoid to test again anything that has been already tested by the automated suites. And this apply to any other kind of tests implemented before.

Designing the tests suite

So based in all the concepts and theory described above, how do we select what type of test apply to the different components of the app? What should be the scope of the integration tests? Let’s see with a practical example what could be an effective design.

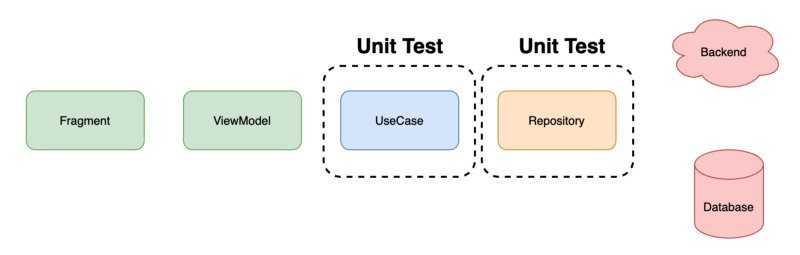
Below we can see a classic Clean Architecture approach to implement a common use case in an application, this is we fetch some data from a remote or local data source and then display on the screen some kind of information based on this data.

A common Clean Architecture approach with data flow directions

So, let’s start with the Unit Tests. As mentioned before we want to test the unit of behaviour of a specific component. In this example as we can see in the diagram below, we want to test the Use Case (also known as Interactor) and the Repository. These components might contains logic that we need to test. In the case of the Repository it could be the logic to select between source of data, or some data model transformation, etc. Same thing with the use case, we might have some business logic or any other domain operation that needs to be tested.


Now that we have implemented the unit tests for the Use Case and the Repository and we can confirm the correct behaviour and correctness the functionality that they provide individually, is time to validate how these components work together. For this purpose we start with the Integration Test. The idea is to make them as bigger in scope as possible including as many components involved in a feature or data flow as possible. For our example we decide that we are going to test from the repository up to the ViewModel. So providing a fake version of the data that the repository fetch from the backend or database, we will assert that the ViewModel is creating the right states, view data models, etc. This way we are testing all the contracts of all classes involved, the mapping to different models to cross boundaries, the exception management, etc, etc.

In important to note that we are leaving out of the test the components that we don’t control, the out of process elements like the backend and database. We want to run this tests in the JVM and do not depend on a emulator or real device. We want to avoid brittle and flaky tests, and if we depend on a real database or a backend that is going to be almost impossible. If the network fails the test will result in a false negative. If we need to populate the database or wait for a request in a real device, they will be slow and difficult to set up. Below we can see a diagram representing this approach.


Now is turn for the UI test, which are the only ones we want to run in an emulator of real device. For this reason we want to make then small and focused on pure UI assertions. So as represented in the diagram, we are going to inject in our ViewModel the data models that represent a state of the application. We will be using FragmentScenario to launch in isolation that screen and then using Espresso we will assert that the view is actually representing the state defined by the ViewModel. We will be checking that we are displaying the right components with the right copies, is any of them must be visible or not, enabled or not, the events dispatched by the View to the View Model, etc. As we can see here there is no full users journeys and full features tests, just pure UI testing of a single view.


And finally is time for the End to End test where again we are going to use real devices or emulators but in this cases we will be launching the whole app and performing complete users flows and feature testing as described in the diagram below.

Summary

So this is it. In this first part about implementing a good test strategy for our Android projects I have tried to define and explain an approach that I considered balanced and effective. The main goal is to maximise the time and dedication spent in testing while getting the most return of investment and minimising the human testing efforts.

In the following articles we will focus on the details of the different type of tests, recommendations, best practices and implementation details for a good automated test.

I would love to hear your feedback, ideas or different approach about this topic and the content of the article. Please feel free to drop any comments and thanks for reading!

Security matters: A quick introduction and some tips for Android developers

Quite often the security aspect of our apps is not taken in consideration when we are working in our projects. Generally speaking the mobile ecosystems are perceived as very secure due the particular architecture and design of the main platforms (Android and iOS) compared to other platforms like, let’s say the Windows PC operating systems.

Android-Security-appsFrom a user point of view there is also this relaxed perception about the security of our devices. As we are going to see in this post we should take much more seriously the security of our platform, as developers and also as users, taking into account the massive amount of personal information that we carry in our devices. And here we as developers have a big responsibility.


The evolution

The malware and cybersecurity threats as we know it’s not something new. Hackers are being around for a while and their practices have been evolving with the progress and evolution of the computer systems.

In the early days malware were usually more kind of a joke, experiments and bit of fun with normally no much harm done in the attacked system. We remember virus like the ping-pong, bars, etc that were just an annoying joke in most cases.

Later on, massive infections of more disrupting malware started to spread mainly in the Windows platform, we remember viruses like Melissa, Conficker or Sasser that infected millions of computers around the world in a few hours, and in some cases leaving the systems unusable.

Pretty soon hackers realised that there was an opportunity to make money exploiting systems and vulnerabilities so this was the next logic step in the malware evolution. For example, very well known in these days are the ransomware cases where the attacker request an amount of money in order to unlock and decrypt the user machine.

And last but not least we can’t forget the special interest and effort of almost all governments around the world and how they are investing fortunes in spying, attacking and influence to internal or external targets for political and strategic interests.

With the popularisation of the portable devices it was a matter of time that they become the target of the bad guys who would try to access the massive amount of information collected by these powerful tools, not only personal information like bank accounts or emails but also access to critical sensors, location, microphone, camera, etc.


Threats in the mobile platforms

Based on Kaspersky report for Q1 of 2017, the mobile products of the security company detected 1,333,605 malicious installation packages, 32,038 mobile banking Trojans and 218,625 mobile ransomware Trojans.

Screen Shot 2017-08-13 at 09.17.50

Distribution of mobile malware by type (C) Kaspersky Lab 2017


One of the most common malware types identified were Trojans capable of gain super user rights. This is doable by exploiting well known vulnerabilities in older versions of Android. Unfortunately is quite common in the Android ecosystem that many devices never receive the latest updates of the OS to fix these vulnerabilities.

As we can imagine, once these malicious programs has gained super user rights, the possibilities and ways to control the device are massive. Read and alter text messages, modify URLs, steal login credentials, key logging, encrypt data, etc. just to name some of them.

These malware samples are not only distributed in dodgy stores, but also Google Play has been used to spread these malicious apps despite the improvements and effort from Google to increase the security and analysis of all the apps published in the market.

One example as reported by Kaspersky Lab was a Trojan app that was supposed to be a Pokemon Guide. But underneath, the application contained malicious code that downloaded rooting malware and installed unsolicited apps.


Screen Shot 2017-08-27 at 11.20.11

Source: Kaspersky Labs


This application was downloaded more than 500,000 times and managed to perform at least 6,000 infections.

Another example was the false OS cleaning app Wiperius, that in reality was a Ransomware tool able to encrypt the device disk and afterward demanded a ransom to unblock the phone.

mobile_malware_evolution_2016_en_3

Source: Kaspersky Labs


As we can see the mobile platforms are not so secure as most of users might think, compared to other traditionally more affected platforms like Windows.

So from a developer point of view, what can we do to make our apps more secure? How can we avoid hackers trying to break into our systems? How can we keep the personal data of our users safe and sound?


OWASP Mobile Security Project

OWASP is a non profit organisation and an open community dedicated to help organisations to develop, maintain and operate Software that can be trusted.

As part of the organisation there is the OWASP Mobile Security Project with the goal of classify mobile security risk and provide resources to mitigate the risk and impact of any possible threat, with the focus on the developers and at application level where we can make a difference in our apps.

They provide a few really helpful tools and frameworks like the Mobile Security Check List and Testing Guide, a list of tools and one particularly interesting for us as developers which we are going to focus our attention now, The Top 10 Mobile Risks.

Let’s take a look to the list and see how we can make a difference as developers to make our platform a safer system:


M1 – Improper Platform Usage

Misuse of a platform feature or failure to use the OS security controls, like Intents in Android, permissions, misuse of Touch ID, etc.

For example asking for too many or risky permissions can provoke misuse of them and increase the risk of an attack. Or using implicit Intents to run a Service, because you don’t know which service will respond to the Intent.

We can find here the official Android documentation about security tips and good practices.


M2 – Insecure Data Storage

Insecure data storage includes things like SQL Databases, Log files, binary data, resource files, etc.

For example, an app that is logging publicly critical or sensitive information of a user, or a “hidden” url of our backend services. Or an app that is storing sensitive non encrypted data in shared preferences or the database. If an attacker gain access to our device would be quite easy to get lot of personal information or critical for our business.

Follow the guidelines for storing data of the official documentation.

M3 – Insecure communication

Exploit any vulnerability to intercept sensitive data while travelling across the wire. This includes communication using Bluetooth, Wifi, NFC, GSM, etc.  As sensitive data we understand things like session tokens, account details, metadata, passwords, etc.

As an example of attack scenarios we have seen apps sending personal information via non secure channels instead of SSL, or applications accepting connections even though certificates handshake fails.

Some recommendations to mitigate this threats would be using SSL/TLS, strong cypher suites, certificates signed by CA provider, do not send sensitive information via SMS or notifications, etc. Once again for a more complete list of recommendations check the official Security with HTTPS and SSL and Network Security Configuration.


M4 – Insecure Authentication

In this category we include the bad user authentication and session management, like failing to identify and/or maintain the identification during the app life.

Once an attacker understand and exploit a weak authentication process, he would be able to perform malicious request to our backend services,

Some ways to prevent these attacks: Ensure you always perform auth in the backend side, do not store credentials locally. If you need to keep any auth info in the device always do it encrypted. Do not use weak auth mechanisms like 4 digits Pin codes.


M5 – Insufficient Cryptography

So you are using cryptography but is not strong enough or your encryption process has flaws and weakness. In this scenario an attacker that have access to our device, if we are storing sensitive information encrypted but this is not strong enough or we are managing wrongly our keys, the data could be extracted and decrypted.

To avoid this scenarios use a strong cryptographic standards, avoid (if possible) to store sensitive information, use hardware backed encryption (if possible), etc.


M6 – Insecure Authorisation

Important here to understand the difference between Authorisation and Authentication. Where authentication is the process to identify an user, authorisation is the mechanism to check that the user has the right permission to perform a task.

Weak or flawed authorisation process might allow an attacker to perform actions as administrator of the system.

To avoid this scenario store the rules for authorisation only in the backend and do relay on device stored rules, perform authorisation checks when the app is hitting the backend on task requests, etc.


M7 – Client Code Quality

Here as mobile developers is where we have a big responsibility. Poor code standards, either intentionally (taking shortcuts, workarounds, tech debt or even malicious developers) or unintentional (junior or low skilled developers) can end up in poor quality code. And this will make vulnerable to memory leaks, buffer overflows, etc.

In order to avoid this maintain consistent coding practices, perform code reviews, use automated tools to detect leaks and other defects in the code base, implement a continuos learning and improving policy in your team, etc.


M8 – Code Tampering

There are different attack vectors in code tampering, like reverse engineering and modifying resources or even code source of the released app package, change dynamically the content of the memory at runtime of the app, replace the API that the app is using, etc.

Applications like games are quite susceptible of these attacks for example to skip payment for paid versions of the game, new features, etc.

For more information about this refer to this OWASP project.


M9 – Reverse Engineering

Hackers can download the app from the store and decompile our binary looking for source code, libraries used, assets, algorithms, etc. trying to find vulnerabilities and points of attack.

There are a few tools and solutions that we can use to obfuscate and make reverse engineering as difficult as possible, like the well known Proguard or more complete and complex commercial solution like Arxan.


M10 – Extraneous Functionality

An attacker can download the app and analyse it looking into logs, source code, configuration files, etc. and try to find extraneous functionalities. They will try to find hidden switches or backend APIs in order to perform an attack.

To avoid this, before releasing the app check for any app configuration settings where you disclose switches or hidden back doors. Check for public logs disclosing sensitive information, check that all APIs are well documented and no hidden administrative or debug endpoints are available.


Conclusion

As we have see the Android and others mobile platforms are not 100% secure. There are many attack vectors that hackers can exploit and we as developers have a massive responsibility to keep our systems and users safe.

A security breach can destroy the reputation and even the whole company itself so let’s do all what is in our hands to prevent crime, be aware of the risks and develop software with security always in mind.

As usual please leave any comments or suggestions that you might have.

Safe coding!

Tagged ,

Rebuilding a legacy app from scratch (III): Clean Architecture.

Once we have decided the features we want to have in our Minimum Viable Product version of the app, and before jumping straight away to start coding, we need to decide how are we going to design and architect the application.

Why we need to implement a good architecture? Because we want the code base of our application to be testable, scalable, robust, modular and maintainable, among other things.

Over the years a few architectures patterns has been defined and used by Software engineers for different platforms and systems but one of them that has gained lot of traction and popularity in the mobile community is the well known Clean Architecture.


What is Clean Architecture?

This pattern was defined by Uncle Bob and described in this blog post.

He summarise the main goals of a good Software Architecture:

  • Independent of Frameworks: We want to isolate the Android or iOS framework from our business / UI logic, making them testable and interchangeable.
  • Testable: This has been one of the traditional issues when designing the testing strategy of our apps, it was difficult to test a module that has many external dependencies, like the Android SDK.
  • Independent of UI: We want to have our UI independent from our business logic, this way the last one can be unit tested without having to depend on UI or Integration tests.
  • Independent of Database: The source of data must be isolated from the rest of layers of the app, this way we can change this source without affecting the logic of the app.
  • Independent of any external agency: The business logic doesn’t depend on any external factor.


An Android approach to Clean Architecture

So for our Android implementation of the Clean Architecture we are going to follow the design described by Fernando Cejas in one of his great blog post.

We are going to identify three main layers in the code base: Presentation layer, Domain layer and Data layer.


Presentation layer

We are going to use  the Model-View-Presenter (MVP) pattern to implement this layer. I will explain briefly this presentation pattern but you can see a more detailed explanation in my introductory article here.

Basically we are going to have a View entity,  where we implement the Activities, Fragments and Views. These are what we call passive views, what means that they are totally dumb and have zero presentation or business logic. They just display information in the screen under the direction or the Presenter and dispatch events back to this one, like user actions.

Then we have the Presenter that as mentioned previously contains all the presentation logic and is acting as a bridge between the View and the Model layer. This entity should not have any Android dependency, but it knows how to respond to user actions and how to retrieve the information or data that is required to display in the view.

And finally we will have the Model layer that will contain the bridge and adapter classes accessing the Domain layer of our architecture.


Domain Layer

It’s going to contain all the business logic of our app. Once again there shouldn’t be any Android dependency in this layer. In here we will implement what we call Interactors, which basically are Use Cases.

For example, if we look into the MadridBus application, we will see that one use case is to get the list and information of all the bus lines in the city. This logic will be implemented in one Interactor and it will be used by the Presenter of the Line List View.

So when the user open the line list screen, the View is going to tell the Presenter that it has been loaded, the Presenter knows then knows that have to retrieve the line list, so it’s going to instantiate and use the GetLineListInteractor, which is going to access the Data Layer to get the list of lines. When the data set is returned the Presenter knows calls the View and tell it to display this information in the right way.


Data Layer

In this layer is where all the data of the application is stored and processed. This layer is responsible of providing the mechanisms to retrieve the data that the app needs. The Interactors will be calling the API of the data layer so they can retrieve this data to the Presenters.

We want to make the data source totally agnostic for the rest of the different layers of the app. This means that the Interactors doesn’t know from where the Data layer is extracting the information, they will just call the interface of the API exported following the Repository Pattern.

Screen Shot 2017-04-27 at 22.47.21

From Hannes Dorfmann blog post 


For example, in the app we are going to have two sources of data, the first one will be the Cloud, from the public transport agency data service. Then we will have the local database, where we will save the data taken from the cloud, so the next time when the GetLineListInteractor call the Repository to get the list of lines, if this exist in the local database, it will retrieve from there, and if not it will retrieve it from the cloud.

To read more about the repository pattern check out this great blog post from Hannes Dorfmann.


The project structure

One importante aspect when designing our code base which is dependent on the architecture of the app is the structure of the different modules and how are they grouped in the project.

As Uncle Bob says, this is like a blue print of the application. Looking at the project structure should give us an idea of what this system is about.

Screen Shot 2017-04-23 at 00.27.36

As we can see in the screen shot, the project has four main module groups: DI, Domain, Model and UI.

In DI we have all Dagger 2 dependency injections helpers.

Domain as we have mentioned before contains the business logic, interactors, network modules, rules, etc.

In Model basically we have Pojos and data classes.

Finally in UI we have all the Presentation layer modules, like Activities, Presenters, etc.

With this project structure we can easily find and navigate to a specific feature or functionality of the app, either the UI part, the Domain or the Data component of it.


Conclusion

A good architecture is the blueprint for our project, it will guide our implementation and will keep the maintainability, testability, cohesion and modularity of the project.

Clean Architecture is not the silver bullet nor the only way to design our apps, but has proved to be one of the best solutions.

We will be following this pattern in the MadridBus source code implementation that you check out in Github here.

Tagged , , , ,

Rebuilding a legacy app from the scratch (II): Adding Continuous Integration with Travis CI

Continuous Integration (CI) is a Software engineering practice where developers in a team continuously integrate their work in the main stream of source code at least once a day.

Why?

The main goal of the CI practice is to reduce the integration problems that quite often happen when we have a team of several people working in different features and parts of our system. The sooner we integrate our code the easier is to identify problems like dependencies between modules, compilation issues, regression, duplication in code, etc, etc.

How?

Continuous Integration is overall an attitude and good Software practice. In order to achieve it we need some tools and organisation.

First of all we need our source code in a repository, in our case to maintain MadridBus app we are using Github in a public repository.

Next we need a platform to perform the automatic builds of our code every time we push code to the repository. For our app we are going to use Travis CI. Travis is a hosted distributed CI platform, it’s free for public repositories and it’s quite easy to integrate and configure in our project.

Finally we need a good suite of Unit Test that are going to run every time a new build is launched, that as we mentioned before is going to happen for each push that we make in our repo. We will talk about the testing strategy in further posts but in the mean time you can take a look to one of my previous posts.

TRAVIS CI configuration

So first thing is going to https://travis-ci.org/ and we sign in with the Github account travisci-mascot-1-bc6a3179f3e8e1ab1456634bd55a448awhere we have allocated the Android project.

Then we are going to select the project we want to set up with continuous integration and that’s pretty much it, we can start building!

But not so fast, probably your build is going to fail as we need to set it up properly for Android projects, and the way to do this is adding the “.travis.yml” configuration file.

Below you can see the current MadridBus Travis configuration file:

language: android

jdk: oraclejdk8

cache: false

sudo: true

env:
  global:
    - ANDROID_API_LEVEL=25
    - ANDROID_BUILD_TOOLS_VERSION=25.0.0
    - ANDROID_ABI=armeabi-v7a
    - ADB_INSTALL_TIMEOUT=20 # minutes (2 minutes by default - see #247)

android:
  components:
    - platform-tools
    - tools
    - build-tools-$ANDROID_BUILD_TOOLS_VERSION
    - android-$ANDROID_API_LEVEL
    # Google Play Services
    - extra-google-google_play_services
    # Support library
    - extra-android-support
    # Latest artifacts in local repository
    - extra-google-m2repository
    - extra-android-m2repository
    # Specify at least one system image
    - sys-img-armeabi-v7a-android-$ANDROID_API_LEVEL

# Emulator Management: Create, Start and Wait
before_script:
  - echo no | android create avd --force -n test -t android-21 --abi armeabi-v7a
  - emulator -avd test -no-skin -no-audio -no-window &
  - android-wait-for-emulator
  - adb shell input keyevent 82 &

script:
  - android list target
  - ./gradlew connectedAndroidTest

licenses:
    - 'android-sdk-preview-license-.+'
    - 'android-sdk-license-.+'
    - 'google-gdk-license-.+'

Right, so let’s take a look to the interesting parts. As you can see in the first two lines we are specifying the project type with “language: android” and the JDK version 8 to be used to compile with “jdk: oraclejdk8”.

Right now by default Travis will build our project with Android SDK 24, so if we want to install and build with a latest SDK and use any other additional component we need to specify it as we can see it in the section “components” under the “android” tag.

As you can see in the example we are indicating that we want to use Build Tools version 25.0.0, Android SDK 25 and also that we are using Google Play Services adding “extra-google-google_play_services”. One important thing here is to tell Travis to accept all the licences when installing additional components, otherwise the build will fail. For this we are adding the section “licenses” as you can see above.

Finally we want to launch an emulator so we can run the tests. To accomplish this we are adding the section “before_script” where we are launching and waiting until is running for the emulator with the image type as configured in the field “sys-img-armeabi-v7a-android-$ANDROID_API_LEVEL”.

And that’s it! We just need to push new code to the repository and Travis will build automatically the project and run the tests for us.

In next posts we will see how to add our testing strategy including Unit Tests with JUnit, Integration Tests with Espresso, mocking with Mockito, etc.
Stay tunned!

Tagged , , ,

Rebuilding a legacy app from scratch: MadridBus revamp (I)

MadridBus was the second application that we released in Quoders to the app store. It is an adaptation from the original BilbaoBus, an app to get public transport information like routes, stops info, timetable, etc. It was born just as a learning side project but we got good traction from the beginning  and it grew up having more public transport agencies, improved UI, etc.

screen-shot-2016-10-01-at-09-27-38On the other hand MadridBus wasn’t so popular, probably because there were already a few decent applications in the market for the city of Madrid, so we didn’t focus so much on it. As a result, now days the app looks and feel really outdated, the UI is clunky and the plumbing of the app are really ugly and not maintainable.

So for this reason I have decided to rebuild the app from the scratch as one of my side projects. It will be open source published in Github. I will be explaining here in the blog all the design and implementation decisions, the different techniques, libraries, etc. The goal, apart from having a new and better application, is to have a project that could be a reference for new Android developers and hopefully help them to have a better understanding in how to implement from zero an Android app following good practices, patterns and explain the usage of Android concepts and most used libraries.

In this post I am going to give a quick summary of the different features, patterns, design and other elements that I am going to use following the best practices and modern Android development techniques. In following post I will be describing in more detail each of these elements and explaining the implementation and the source code will be available on Github.

Minimum Viable Product scope and features

So first thing first, let’s define the MVP (Minimum Viable Product) features and requisites.

The current published version of MadridBus has five main features:

    • Go To: This feature allows the user to search a route between point A to B, either pointing in the map or searching by address. This functionality, despite being really useful when you don’t know the city or the best route, interestingly it’s not very used as our Google Analytics data reveals.
    • Line List: Display the list of all the lines (day and night) available and allows the user to see the stops for a specific line and then the next bus time.
    • Stops List: Display a list of all the bus stops in the network. This functionality again is not really very useful, unless you know the name of the stop and want to look up.
    • Favourites: This is really useful as the user can save here to have quick access to the favourites stops, like work, home, etc.
    • News: Display a list of news fro the rss service of the bus agency. Useful when there are disruptions, changes, etc.

So for the MVP of the new app, taking into account what features the users are really using in the published app,  I’m going to go for the Line List, Favourites and News. Also we will be releasing an Android Wear app that will displayFor the V2, we will be adding the Go To feature and maybe the Stops list.

App architecture: Data access and storage

A public transport application needs to work with an extensive and complex source of data containing lines information, time tables, real time, geolocation, etc.

For MadridBus we are going to need two different set of data that we will retrieve from the Madrid public transport agency web servers:

The first one are static data that needs to be downloaded periodically and stored in the device for quick access offline.  This set of data contains the bus lines info, route s, stops position, etc.

The second type of data are the real time information, this will be accessed when we needs to display the real time info of the next bus for a specific stop.

To accomplish this network access we are going to use the well known library Retrofit from Square.  There are other options like Volley from Google but in my personal opinion and as you can see in some reviews like this, Retrofit is much better option. For more information you can check my blog post about Retrofit.

For the data storage on the device we are going to use a local data base managed with the library Realm. Databases in Android usually is a pain to implement using the SQLite API, but with real we simplify and make more robust and less error prone our data base implementation. It supports multithreading, encryption, reactive extensions, etc.

UI Layer: Material design

So now let’s talk about the UI layer. As we mentioned before, for the version 1 we are going to implement just the Line list, Favourites and News functionalities.

We can see clearly three different features that will need three direct access from the home screen. So following the Material Design guidelines we are going to use the recently added Bottom Navigation widget that will give us access to the three different features of the app. As we can see in the documentation,  this component is recommended for between three and five sections. In case we needed more is recommended to use a Tab view component or maybe using the left navigation drawer.

So the first option is the Home view and it will display a Google Maps showing the location of the user and the nearest bus stops. The second option will be the Line List, using a Recycler view to display the lines info, and the third option will be News screen, again using a Recycler view. We will post designs and wireframes in a future post when we start implementing this.

UI Layer: The MVP pattern

The MVP is now days one of the most used patterns in the Android community  when it comes to organise the UI layer. There are multiple benefits like much more modular, reusable and testable code. For a complete description and explanation of the pattern take a look to one of my previous blog post.

As a quick summary, the Activities, Fragments and custom views will be the View layer of the pattern and they will contain only pure UI functionalities.

The Presenter will be a man in the middle layer that will work as intermediary between the Views and the Model. They will respond to events and actions from the user on the View and it will perform any action required using the Model layer.

Modules wiring and communication

So as we are going to have different layers in the app following we need some mechanism to communicate with each other, passing data, etc.

There are different ways to accomplish this, we have just the traditional way using listeners, but we agree that this comes with many problems and we end up with the infamous hell of listeners.

Another better solution would be using an event bus, but this again has its own downside. The code end up being less readable it grows up having multiple events dispatching from everywhere with unexpected results.

There is a better solution and will be using RxJava. As we know it’s one of the library and techniques that has focused the attention of the Android community for a while now.

We will see in a future post and in the code of the app how to use RxJava and how to architect the app using it and all the benefits that it has. In the mean time you can have a look to my blog post about it.

Testing and Continuous Integration

Testing is often one of the most neglected aspects of the applications development process. For our application we are going to implement two main type of test: Integration Test using Espresso (UI test) and Unit Test when relevant with JUnit.

For more information about a good testing strategy take a look to my blog post about it.

Continuous Integration is another key piece of our app development as it allows us to have a build of our app everytime we submit changes to the code repository. This way we can launch our tests suite every time we make a change in the code validating it’s correctness.

For this functionality we are going to use Travis, a CI platform totally free for open source projects. Once again we will be explaining the configuration in next posts.

Summary

So that’s it for today, as mentioned before we are going to be publishing blog posts to comment and explain the implementation of the different parts of the new app as we progress coding it.

Stay tuned!

Introduction to RxJava for Android by examples (I)

rxjava

Reactive programming is one of the hottest topics amongst the Android community these days. Lot of big guys in the industry are embracing and using RxJava in their platforms and applications, even Google has release their own version of a reactive library called Agera.

One of the problems of Rx programming is the initial learning curve, the complexity of the paradigm itself and the extension of the library operators and classes.

The goal of this post is to make a very simple and easy to understand introduction with some examples and be able to start programming and design our apps using RxJava.
 

What is RxJava?

RxJava is just a library that implements ReactiveX extensions, which basically facilitate the implementation of  asynchronous programming using observables data streams.

It can be described as a combination of the Observer (there is one entity emitting data and one or many listening or it) and Iterator (the data flow are dispatched in onNext events sequences)  patterns using the Functional Programming paradigm (we get data in declarative style methods and avoiding mutable objects).

RxJava is one of the language implementations of the ReactiveX libraries. At the moment there are also other versions available for languages like JavaScript, C#, C++, Swift, Kotlin, etc…
 

Why RxJava?

So if there is the learning curve and complexity issue, why to bother learning RxJava? These are some of the main reasons:

  • Abstraction of complexity of async data flows and events. It’s quite common to fall into the hell of nested and multiple listeners, the hell of multiple events from everywhere when using an event bus, etc. With RxJava we can simplify all this using just asynchronous stream of transformable data.
  • Filtering, composition, transformation. Thanks to the massive amount of operators we can easily transform any stream of data transmitted. As we will see later we can filter, combine, transform, create, etc. any kind of data stream.
  • Error handling.  Very straightforward error handling by centralising in a single callback method any error, stopping the data sequence.
  • Easy testing. Having a single source/destination of the data source and testing helper classes make it quite easy to test.
  • Light and high performance. RxJava is light and fast, at the moment it weights around 1 MB and it’s quite fast streaming our data.


The key components

So let’s take a quick look to the key elements that compose the RxJava library.

The Observable

This is the data source, the object that will be emitting the sequences of data items that the entities who are interested in the data they provide, will be subscribing.  It implements all the operators mentioned before to be able to transform the data streams. Observables can be divided in two types: “Hot” observables which might emit data as soon as they are created  and “Cold” observables which wait until an Observer subscribes to it.

The Observer

This is the type of object that will be subscribing and “observing” the data emitted by the Observable, they will “react” somehow using the data provided. Typically they implement the three main events OnNext, OnError, OnComplete as we will see later.

More info in the official reference here.

Operators

These is one of the key and most powerful features of RxJava. There are quite a lot operators of different types that will help us to manipulate and transform in many ways the data streams. We can group them in different categories such as Creating, Transforming, Filtering, Combining, Mathematical, etc.

For a complete list of operators take a look to the documentation following this link.

Schedulers

The Schedulers will help us to implement multithreading in our data streaming. Calling the Observable method “SubscribeOn” and indicating one of the Schedulers we can select in which thread the Observable will do it’s data stream job. On the other hand, calling the method “ObserveOn”, will set up the thread where we will be receiving and observing its data stream.

In RxJava the most common Schedulers are “NewThread” (create a new thread for each job), “io” (for input/output operations), “computation” (event-loops, callbacks processing, etc), “immediate” (perform the job immediately in the current thread), etc.

Subject

A Subject is object that is able to act as Observable and Observer. It can emit data streams and at the same time can subscribe to another data stream source (Observable), so we can think in it like a sort of bridge between two data streams.
 

Example 1: Simple subscription to a source of data

For our first example, we have a method that create a list of numbers and in order to simulate a long operation, we have added a 100 milliseconds thread pause in the loop.

The method look like this:

private List<Integer> getOddNumbers() {
    List<Integer> numbers = new ArrayList<>();
    for(int i=0; i<100; i++) {
        if(i%2 == 0) {
            try {
                Thread.sleep(100);
            } catch (InterruptedException e) {
                e.printStackTrace();
            }
        }
    }
    return numbers;
}

 
Now we create the Observable that is going to emit that list of numbers. To accomplish this, in this example we use the “fromCallable()” method that is going to build an observable which will emit the list of numbers retrievedby the callable method:

private Observable<List<Integer>> getOddNumbersObservable() {
    return Observable.fromCallable(new Callable<List<Integer>>() {
        @Override
        public List<Integer> call() throws Exception {
            return getOddNumbers();
        }
    });
}

 
Right, so now that we have an Observable which is going to emit some data, what we need next is to create an Observer that is going to subscribe to that source of data and receive the numbers list. Let’s have a look to a standard Observer:

private Observer getOddNumbersObserver() {
    return new Observer<List<Integer>>() {
        @Override
        public void onCompleted() {
            LogHelper.addLog(mTvLog, "getOddNumbers() - onCompleted()");
        }

        @Override
        public void onError(Throwable e) {
            LogHelper.addLog(mTvLog, "getOddNumbers() - onError()");
        }

        @Override
        public void onNext(List<Integer> integer) {
            LogHelper.addLog(mTvLog, "getOddNumbers() - onNext()" + integer);
        }
    };
}

 
As we can see, the Observer implements three fundamental methods: onNext will be called when the Observable emit an item. onCompleted will be called when the Observable has finished emitting data. And finally onError will be called if there has been any exception or error when emitting data.

We can simplify the Observer in case we just want a single event that will receive the list of numbers and we don’t need to know about the OnComplete and OnError events. To accomplish this we just need to create an Action instead of the Observable, something like this:

private Action<List<Integer>> getOddNumbersAction() {
    return new Action<List<Integer>() {
        @Override
        public void call(List<Integer> integers) {
            LogHelper.addLog(mTvLog, "getOddNumbersAction() - call: " + integers);
        }
    };
}

 
So the last step would be to subscribe this Observer to the Observable, and it would be as simple as this:

    observable.subscribe(observer);

 
And that’s it! When the getOddNumbers() method has finished the calculation of numbers and return, the Observable will dispatch the list of numbers and the Observer will receive the data.
 

Summary

So this has been the introduction and basic operations with RxJava.
You can find all the examples in this public repository.

In next posts we will be looking deeper into more elements of the Reactive extension, like the Operators and Schedulers, etc.

In the mean time please leave here any comments, suggestion or corrections you might find!
 

Tagged ,

A beginners guide to an effective Android testing strategy

Testing quite often is one of the most neglected aspect in many Software projects, and in Android this has been particulary a common issue since the beginning of the platform.
atsl-logo

Even Google didn’t seem to be making big efforts to encourage testing: Documentation was almost nonexistent, the tools and frameworks were confusing or hard to use and there was almost impossible to find an open source project with good testing implementation.


Why testing?

Implement a good suite of different type of tests with a good coverage ratio and maintain it requires time and discipline from the dev team. In some cases the member of the team might not be familiar with the testing frameworks or even never have implemented any  type of test. So what are the benefits of this time and resource investment? Here some of the reasons:

  • Testing allows us to check the correctness of the app features. We should never rely on the QA team to find defects in our code. Is a very common practice to implement some feature, test a couple of use cases, send it to the quality team and wait until they find a few bugs for us and then fix it. This is really a bad practice that a professional developer should never do. We should be confident that the deliverables that we release to QA team shoulders been tested throughly, has a good test code coverage and that our quality colleagues should almost never find a bug.
  • Improves the design and modularity of our code base. If we create a new feature with a TDD approach, we will be building our classes in short iterations, thinking in the interface and driving the implementation with the proper user requirements in mind. This will make our modules and classes small, independent and with one only responsibility unit.download
  • Help us to implement new features or refactor existing one with much more confidence that our changes will not break current working and tested
    functionalities. If every time we add a new piece of code to our project we run our test and all pass, we can be sure that we didn’t implement anything that is affecting and having negative side effects on the existing features.


Types of test

In the Android platform, generally we will implement two categories of tests: Unit Tests and Integration Tests.

  • Unit Tests.  We will test small and independent pieces of code. It might be a single class, an interface or just a method. We can consider it as the smallest possible testable piece of code part of an specific independent module. In Android we will use JUnit running either locally on the JVM (prefer this one as fastest method) or in an emulator or real device.
  • Integration Tests. We are testing more than one individual module working together that implements a complete functional part of our system. For example we test the Login feature of our application where different entities works together and and we want to test that the login process is accomplished successfully on different scenarios. In this case in Android  we will implement UI Instrumentation tests with Espresso and Automation tests with UI Automator.


Architecting the app for testing

As we mentioned before one of the complains of the Android community was that testing the platform was a difficult task. Apart from the lack of a good testing framework, the developers faced the problems of implementing tests for modules (Activities, Fragments, etc) coupled to multiple Android SDK dependencies.

In order to mitigate this issue, one best and most common solutions is to architect our application using the MVP pattern. With this approach we manage to have a clear separation of concerns of our modules making much more easy to unit test our models and use cases classes without having to mock and get around of all the Android SDK dependencies.

Typically we will have our View layer with the Activity or Fragment that have almost no logic at all. A Presenter acting as a bridge and a Model which will have our use cases and where we will probably focus most of our unit tests.

In a previous I made a basic introduction of the MVP pattern where you can see all these concepts with more detail.

Test Pyramid

Following the TestPyramid concept described by Mike Cohn, Unit Tests should be around test_pyramid60-70% of our test code base and the rest 30% should be implemented as End-to-End tests (Integration, functional, UI tests).

The reason for this is that the end to end tests has a few problems, like you need to wait until the app is deployed and running in a device. Then probably the test will have to deal with things like login, registrations, database access, etc.
Also if you find a bug it will be hard to figure out where exactly the problem is, as it could be in any of the multiple modules and components that are involved in the specific user flow.

On the other hand Unit Tests are fast, reliable and they isolate the test scope to very specific and isolated pieces of the system which makes it a much better way to identify the defects in our system.
If we have build our code base using TDD, we will probably have test covered almost all modules of our application which will give us peace of mind that all parts of the application are being tested and any regression would be detected.

Implementing Unit Tests

First let’s add to the project build.gradle file the required dependencies for Espresso, JUnit, UIAutomator, etc.

    // Dependencies for unit testing
    testCompile 'junit:junit:4.12'
    testCompile 'org.mockito:mockito-all:1.10.19'
    testCompile 'org.hamcrest:hamcrest-all:1.3'

    // Android Testing Support Library's runner and rules
    androidTestCompile 'com.android.support.test:runner:0.3'
    androidTestCompile 'com.android.support.test:rules:0.3'

    // Espresso UI Testing
    androidTestCompile 'com.android.support.test.espresso:espresso-core:2.2'
    androidTestCompile 'com.android.support.test.espresso:espresso-intents:2.2'

    // UIAutomator Testing
    androidTestCompile 'com.android.support.test.uiautomator:uiautomator-v18:2.1.1'
    compile 'javax.inject:javax.inject:1'

As we mention before we have two options to run Unit Tests, one is locally on the JVM and the other is running with UI Instrumentation runner. We will favour the local JVM test as they will compile and run much faster. The downside is that these can’t have any Android SDK dependency, but that should be our goal as we saw before using a MVP pattern.
One way to overcome this issue is providing any Android dependency using a mocking framework like for example Mockito.
This will be fine if we just need to mock a couple of dependencies with not many interactions between our code and the SDK, but if we have more complex interactions and we need to spend hours mocking classes, this would be a signal that we should run those test in a emulator or device using Instrumentation Test.

To add the tests in the project we haver will need two folders, one for each type of test as you can see in the picture below, the Unit Test lives in the folder named “test” and the UI test are located in the folder “androidTest”. Both have to be at the same level that our main folder of the project. This is important because otherwise Android Studio will not be able to identify these classes as tests.

Screen Shot 2016-04-02 at 20.14.14


Anatomy of a Unit Test

So now we are ready to add a Unit Test, to do this just add a new class to the Test folders of your project and now we will have to specify which runner we want to use, the size type of the test, etc. Let’s have a look at the example below and we will go through the different parts.

@RunWith(MockitoJUnitRunner.class)
@SmallTest
public class EmailValidationTest {

    String EMAIL_REGEX = SignupPresenterImpl.REGEX_EMAIL;

    @Before
    public void setup() {
        MockitoAnnotations.initMocks(this);
    }

    @Test
    public void givenValidEmail_RegexCheckReturnsValid() throws Exception {
        String validEmail = &amp;amp;quot;david.guerrero@quoders.com&amp;amp;quot;;
        Assert.assertTrue(validEmail.matches(EMAIL_REGEX));
    }

    @Test
    public void givenInvalidEmail_MissingAt_RegexCheckReturnsError() throws Exception {
        String invalidEmail = &amp;amp;quot;david.guerreroquoders.com&amp;amp;quot;;
        Assert.assertFalse(invalidEmail.matches(EMAIL_REGEX));
    }

    @Test
    public void givenInvalidEmail_MissingHost_RegexCheckReturnsError() throws Exception {
        String invalidEmail = &amp;amp;quot;david.guerrero@quoders&amp;amp;quot;;
        Assert.assertFalse(invalidEmail.matches(EMAIL_REGEX));
    }

    @After
    public void tearDown() throws Exception {
    }
}

@RunWith(MockitoJUnitRunner.class)
We specify the runner we want to use, it might be JUnit runner, the Instrumentation, Automation runner or even a custom runner. It depends on how and where we want to run our test.

@SmallTest
This annotation define the type of test we are runing, where “SmallTest” is usually a Unit Test, a “LargeTest” an end to end UI or Automation test and a “MediumTest” is when we are testing more than one module working together, like an Integration Test. See the table below to compare these different types.
Screen Shot 2016-04-03 at 21.19.34

@Before
The method marked with this annotation will be called every time before a test is launched. It useful to initialise and arrange any data needed for the tests.

@Test
This define a test method. It usually should follow the “Arrange-Act-Assert” pattern:
– Arrange all necessary preconditions and inputs.
– Act on the object or method under test.
– Assert that the expected results have occurred.

@After
This method will be execute after each test and we will use it to release resources, close files, etc.

Running the tests

Finally to run the tests we need to select “Unit Test” on the Build Variant menu. After this we can just right click at the Test package folder and then on “Run Tests..” (or Debug or Run with Coverage).

Screen Shot 2016-04-03 at 21.56.15.png


Implementing Integration Tests

As we saw before, these type of test should cover around the rest 30 or 20 percent of our test code base. We will use the Instrumentation and/or Automation frameworks that basically allows us to simulate user interactions on the application that will run in a real device or an emulator.

We are going to use Espresso as our Instrumentation test  framework. With it we can click on buttons, enter texts, do scrolls, etc. See below an example of a Sign Up screen tests.


@RunWith(AndroidJUnit4.class)
@LargeTest

public class SingupTest {

    @Rule
    public ActivityTestRule&lt;SignupActivity&gt; mSignupActivityRule = new ActivityTestRule&lt;&gt;(SignupActivity.class);

    @Test
    public void testperformValidCompleteSignup() throws Exception {

        //  Fill up new user fields
        onView(withId(R.id.editTextCreateUserName)).perform(typeText(&quot;david_&quot; + System.currentTimeMillis()));
        onView(withId(R.id.editTextCreateEmail)).perform(typeText(&quot;david.guerrero@quoders.com_&quot; + + System.currentTimeMillis()));
        onView(withId(R.id.editTextCreatePassword)).perform(typeText(&quot;password&quot;));
        onView(withId(R.id.editTextPasswordConfirm)).perform(typeText(&quot;password&quot;));

        //  Click on Sign Up button
        onView(withId(R.id.editTextPasswordConfirm)).perform(click());

        //  Check progress dialog is showed
        onView(withText(R.string.signup_progress)).check(matches(isDisplayed()));

        //  Assert Home screen has been launched
        onView(withText(R.string.title_activity_home)).check(matches(isDisplayed()));
    }
}

As we can see in the example, we are introducing all the fields needed to perform a new user registration, then clicking on the Sign Up button and assert that the Home Activity is launched correctly after this.
Notice how we have marked the test with the “LargeTest” annotation and we are running it with the “AndroidJUnit4” runner.
To run this test we now need to change to Build Variant to the “Android Instrumentation Test” option and then we just need to choose where to deploy and run the app and the test, either in a real or emulated device.

Summary

So that was a quite brief introduction to a much more complex subject as the testing strategy in Android. There are much more to talk about testing but that will be probably part of further posts.

You can find these examples on my work in progress open source project Treepolis in Github.

As usual please leave any comments, suggestion or corrections. What’s your testing strategy?

Tagged , ,

An introduction to MVVM pattern on Android with the Data Binding Library

In a previous post we made a brief introduction to the MVP architectural pattern, describing how it help us to create a much cleaner, testable and modular source code for our application.

In this post we are going to talk about the MVVM pattern and explain how using the new Android Data Binding Library we can achieve the same level of modularity and separation of concerns but one step ahead, making the data binding with the UI layer less verbose and straightforward, which will produce source code less prone to errors and bugs.


What is MVVM?

Model-View-ViewModel is a variation of the MVC and MVP patterns initially described and implemented by Microsoft to be used on the .NET platform, specifically with WPF and Silverlight technologies that makes use of the XAML language to implement User Interfaces.

In the Microsoft ecosystem one of the main advantages of this pattern is that the designers can implement the View working completely independent of developers using Blend, which is an amazing UI IDE. Then developers can focus only on the ViewModel and Model and wiring everything with the Binding functionality. This in Android is much more difficult as the UI designer tools are not powerful enough.

Screen Shot 2015-12-05 at 10.59.55

Like in the MVP pattern we separate and architect our code in three well defined layers.

The View defines the pure user interface and it has no logic at all except any related only to the UI. If we focus on the Android platform in this layer we would have Activities, Fragments, Dialogs, Views, etc. As we saw in the MVP post these entities will implement an interface that will be use as bridge with the ViewModel layer.

The Model integrates our data strategy, backend support, pojos, and generally speaking what we all know as business logic. These will be implemented via Interactors which defines uses cases of the domain logic.

And finally we have the ViewModel which differentiate this patterns from others. Conceptually this layer is in charge of the same logic as the Presenter in the MVP, which is acting as a facade and brain between our data model and the user interface.

It will be able to identify the application status and display or fetch data and information using the View and the Model. The ViewModel knows how and where to display the information in the user interface. Also it knows where  and how to get this information from the Model.

But the main difference is how this data are passed from the model to the View, which in the VM happen using a mechanism called Data Binding.


What is Data Binding?

Data Binding is a mechanism where a view component is linked to a data entity of the ViewModel without having to implement specific code to transform or assign this data to the visual component. We can send and receive commands and events and also connect data source to the component. In Android this magic happen thanks to the recently added Data Binding Library.

As we can see, one of the main advantages of using Data Binding is the time we save due the amount of code that we don’t have to implement to connect the data and the view and hence the possible bugs and code defects that we will avoid.


Implementing Data Binding on Android

First thing we need to use the Android Plugin for Gradle version 1.5.0-alpha1 or higher.

classpath 'com.android.tools.build:gradle:1.5.0'

Then we configure the app to use the data binding feature in the build.grade file.

dataBinding {
enabled = true
}

Now we need to add the data binding to the component that is going to display the data that we need. For this example we will use two TextView which are going to display a user name and email that we will fetch from a web service using Retrofit. Once we have the response from the server, this info will be automatically updated on the view.

So let’s add the binding code in the layout of our view, in this case we are adding a reference to the pojo class that contains the data that we are binding and that will fill up with the response of our server request. Also we are setting the TextView wit the field of the that contains the specific user name and email:

&amp;amp;lt;layout xmlns:android="http://schemas.android.com/apk/res/android" xmlns:tools="http://schemas.android.com/tools" tools:context="com.quoders.apps.androidbootstrap.mvvm.MvvmExampleFragment"&amp;amp;gt;

&amp;amp;lt;data&amp;amp;gt;
&amp;amp;lt;variable name="commentItem" type="com.quoders.apps.androidbootstrap.rest.model.CommentItem"/&amp;amp;gt;
&amp;amp;lt;/data&amp;amp;gt;

&amp;amp;lt;TextView android:layout_width="match_parent" android:layout_height="wrap_content" android:text="@{commentItem.name}" android:layout_marginTop="15dp"/&amp;amp;gt;

&amp;amp;lt;TextView android:layout_width="match_parent" android:layout_height="wrap_content" android:text="@{commentItem.email}" android:layout_marginTop="5dp"/&amp;amp;gt;
&amp;amp;lt;/layout&amp;amp;gt;

Next we need to initialise the binding objet in the Activity or Fragment. Note that the FragmentMvvmExampleBinding is created automatically by Android Studio:


FragmentMvvmExampleBinding mBinding = DataBindingUtil.setContentView(getActivity(), R.layout.fragment_mvvm_example);

And finally when we have the response from the HTTP request we do the binding with the pojo that contains the data to bind:


mBinding.setCommentItem(mComentItem);

As you can see in this example, the UI component is update on demand when we have the server response data. Although this feature is pretty cool, what makes data binding really powerful is the ability to update the UI component automatically each time that the status of the bind object changes. We accomplish this extending our pojo data class from the BaseObservable class that the Data Binding library provides and setting the fields as observables. In our example it would look  like this:

public class CommentItem extends BaseObservable {

@Expose
private String name;
@Expose
private String email;

@Bindable
public String getName() {
return name;
}

@Bindable
public String getEmail() {
return email;
}
}

There are multiple possibilities like binding collections, resources, automatic setters, etc… But all this due its extension will be the topic of another post!

You can find the source code with this example here in the FragmentMvvmExample. To check out how to implement the division of layers on MVP / MVVM have a look to my previous post.

As usual all comments, suggestions or critics are more than welcome, please leave your comments!


Tagged , , ,

A brief introduction to a cleaner Android architecture: The MVP pattern

As the Android platform has been maturing, developers found that the standard approach to organise the architecture and design of the application code wasn’t the best at all. Usually we ended up having a massive monolithic module, an Activity or a Fragment, containing business and UI logic, creating an unmaintainable and untestable messy project.

Google itself haven’t provided so far a good practice guideline or code examples showing a modular and decoupled approach that implements any of the well known and widely used design patterns, like for example MVC which is encouraged by default on the iOS platform or the common MVVM in Microsoft environments.

One of the most common pattern that the community of Android developers has been using for a while and that has got lot of attention is the Model View Presenter (MVP) pattern and we will focus on it on this post. We will not go through a deep academic description of the pattern but we will focus on the advantages and practical use of it. For an awesome analysis of the MVP and other patterns take a look at this classic post from Martin Fowler about GUI architecture.

So what’s MVP?

18289

Basically MVP is an architectural design pattern that divides our application code in three entities in order to achieve a modular design, implementing the separation of concerns concept, allows an easier implementation of unit tests and making possible to reuse and replace modules either of our UI, data or business layer.

MVP is an evolution of MVC and it has multiple variants and implementations. There has been a lot of conversations and debate about the best and proper way to adopt it on Android. I’m going to expone my way which I have been using in a couple of projects and I reckon works better for me. Of course it doesn’t mean is the best or only one that works on Android, so please leave any comment and suggestions if you find any area of improvement.

Ok so let’s see who is who in this approach.

The View

This entity is going to include the visual part of our app, it is only the UI and it will not have any logic or knowledge of the data displayed. The View doesn’t know anything about the business logic or how to get the data it has to show to the user.

Activities, Fragments, Dialogs, etc… would be included in this category. This elements will contain only initialisation and display functionalities of the visual components and elements to display information to the user. It will not contain any functional or business logic like access to database or web server for example.

This module (Activity, Fragment, etc) exports an interface that will be used by the Presenter, which is responsible and have the knowledge and logic about how, when and what to show in the View. This interface will have methods like “showProgressBar”, “showLoginErrorMessage” or “launchSignupActivity”. Here is an example:

public interface WelcomeView {

    void launchHomeActivity();
    void LaunchSignupActivity();
    void closeActivity();

    void setWrongUsernameError();
    void setWrongPasswordError();

    void showLoginErrorAlertDialog();
}

The Presenter

As we mentioned before, this entity is going to have all the logic and knowledge about what, how and when to display in the user interface. It will be responsible of capture events raised by the user when interacting with the UI and perform any action.

The presenter also acts as a bridge between the View and the Model fetching any data needed from the data layer, making any transformation and display this info to the user on the View.
This entity ideally shouldn’t have any dependency of the Android SDK such us Context or Activity references.

The Activity will have a reference to the Presenter interface and it will use it to communicate any event occurred on the View, like the user tap on a button or the user enter any data in a TextView and then it will decide what to do in reaction of that event.

Here is an example of a Presenter interface:

public interface WelcomePresenter {
    void onCreateAccountClick();
    void onActivityResultCalled(int requestCode, int result);
    void onLoginClick();
}

So for example let’s say that if the user tap on a Logout button, the View call the exported method “onLogoutClick” of the Presenter interface. Then the it knows what interactor of the Model layer needs to invoke to perform a Logout action on the app.

Once the log out success callback has been received, the Presenter will perform any action on the View, for example closing the Activity and displaying a home screen Activity.

The Model

In this entity we will include the “interactors” (use cases of our business logic) that will perform and manage any business layer logic and data access, like fetching data from our web service, accessing the database, etc.

Once we have that piece of data the interactor will send it back to the Presenter and this will decide what to do with this data and how to show it to the View as we saw in the previous point.

Here an example of an implementation of an interactor:

public class WelcomeInteractorImpl implements WelcomeInteractor {

    private WelcomeInteractorListener   mListener;

    public WelcomeInteractorImpl(WelcomeInteractorListener listener) {
        this.mListener = listener;
    }

    @Override
    public void loginWithUserName(String username, String password) {

        ParseUser.logInInBackground(username, password, new LogInCallback() {
            public void done(ParseUser user, ParseException e) {
                if (mListener != null) {
                    if (user != null) {
                        mListener.onLoginSuccessful();
                    }
                    else {
                        mListener.onLoginError(e);
                    }
                }
            }
        });
    }
}

Summary

So this is a very brief summary of what is MVP and how to use it on Android to achieve a cleaner, modular and testable source code. This is just an interpretation of the pattern and is not a silver bullet or the perfect solution for our apps, so any comments or critics are more than welcome!

To see an example of this implementation you can take a look to one of my open source experimental apps “Treepolis”. Is still an in progress project and you can find it here in Github
To see a practical example of the pattern used for the Welcome screen and login functionality check this folder.

Tagged , , ,

Share your Android and iOS application with Google App Invites API

One of the most common features that we usually implement in our apps is the ability of the user to share the app with friends.
This is a great way to make our app grow and a free mechanism of user acquisition.

Normally we have implemented this functionality with some kind of custom message and allowing the user to send it by email, text message, etc.

app-invites

Now we can achieve this with a much better user experience and customisable way using the new Google App Invites Beta API that was announced in the last Google I/O 2015.

With App Invites we not only can share the app but also send deep links, customised invite cards, link with Google Analytics to track the flow, etc.

Integrating the API

So lets start to set up our project adding the Google Play Services metadata in the app manifest:

<meta-data android:name="com.google.android.gms.version" android:value="@integer/google_play_services_version" />

Then we need to add the dependency to our top-level build.gradle:

classpath 'com.google.gms:google-services:1.3.0-beta1'

and also apply the gsm plugin to our app-level build.gradle:

apply plugin: 'com.google.gms.google-services'

Finally we add the Google Play Services dependency in the app’s Gradle file:

compile 'com.google.android.gms:play-services:7.5.+'

Right, next thing we need to add to our project is a Json configuration file that we will get from Google that provides service information specific to our app.
To do this we will have to add in the Google Developer Console our application package name and the SHA1 key from our key store. Click here to access the dev portal to do so.

Once we have the configuration google-services.json file we just need to copy it into the app/ or mobile/ directory of our project.

Sending an app invite

Ok, so now that we have finished the integration let’s do the funny part, and send an app invitation.
To achieve this we just need to build and start an Intent, something like this:

    Intent intent = new AppInviteInvitation.IntentBuilder("Try this app!")
            .setMessage("Hey take a look to this awesome app that I'm using!")
            .build();
    startActivityForResult(intent, REQUEST_INVITE);

If everything went well, when we launch our app and we launch this intent we should see a really nice interface that will show the user’s contacts list and the option to send the invite.

When the destination user receives the invite, depending on if he or she has installed the app different things might happens as we can see in the diagram below:

ai-flow

So that’s it! This is just an introduction but there are more interesting options to explore as the integration with Google Analytics, deep links features, etc.

You can find an example of the integration and use for Android in my examples project here. And as usual any comments and feedback are more than welcome!

Tagged , , ,